If you’re working on an older home, maybe it’s your own cherished 1920s bungalow or a historic restoration project, you’ve likely come face to face with the dreaded peeling paint. Especially if your house was built before 1978, there’s a real chance that paint contains lead. Now, not all paint removal is equal, especially when lead’s involved. That’s where the right tools and techniques come in, and that’s precisely why we want to talk about how using an infrared paint stripper can make a big difference, safely and effectively.

In this post, we’ll walk through why lead-paint removal needs special care, what the Environmental Protection Agency (EPA) says about safe practices, how infrared paint stripping fits into the picture, and finally, how our Eco-Strip infrared paint removers (Speedheaters™ manufactured in Sweden by Speedheater Systems) make this job both practical and preservation-friendly.
Why lead-based paint matters (and why it’s tricky)
In homes built before 1978, lead-based paint was common. The EPA points out that any renovation, repair, or painting job in pre-1978 structures can easily create dangerous lead dust. Disturbing old paint that contains lead, whether by sanding, scraping, burning, or even using high-heat tools, can release lead particles into the air and onto surfaces. Once that dust settles, it poses a serious health risk to children and adults alike. EPA

So what happens if you remove the paint the “usual” way? Dry sanding, open-flame torching, and uncontained scraping often generate large amounts of dust. In fact, some of these methods are prohibited under lead-safe work practices for good reason. For example, the EPA’s RRP (Renovation, Repair & Painting) Program states that certain work practices, such as open-flame burning or using power tools without HEPA exhaust controls, are prohibited when dealing with lead-based paint. EPA (Credit for picture: Zipwall)
In short, if you hit old lead paint with aggressive tools without containment or filtering, you’re likely to stir up hazardous dust or debris that can spread far beyond the immediate work area. Always make sure to use containment equipment.
What the EPA says about safe removal and DIY scenarios
If you’re wondering, “Am I legally covered if I work on my own home?” the situation is a bit nuanced. The EPA’s RRP Rule requires firms performing work for compensation in pre-1978 homes, child-occupied facilities, and similar structures to be certified and to use lead-safe work practices. EPA. For homeowners doing their own work, the rule itself doesn’t always apply, but the hazards still do, and the EPA strongly recommends following the same safe practices anyway. EPA Here are some of the key DIY-friendly steps from the EPA’s “Lead-Safe Renovations for DIYers” guidance: EPA
- Determine if lead-based paint is present. If your home was built before 1978, assume it may contain lead.
- Set up your work area safely: seal off the area or create an airlock, if necessary.
- Remove furnishings and use plastic sheeting on the floors to contain dust
- Protect yourself: proper respirators, disposable coveralls, gloves, and safety gear.
- Minimize dust: Use work methods that reduce dust generation like infrared paint removers; control the spread of debris; clean often.
- Waste control: Bag and contain debris; dispose of waste per regulations (don’t just throw lead paint chips in a regular trash).
- Clean up thoroughly: At the end of the job, clean with HEPA vacuums, wet cleaning methods, and then check all
- Final clearance: Although homeowners may not always be required to get a clearance test, it’s wise to verify cleanliness, if possible. Your family’s safety is first.
And a reminder: As of October 2024, the EPA finalized even more stringent standards for dust from lead-based paint hazards effectively stating that any detectable level of lead in dust in pre-1978 homes is considered a hazard. So yes — when you’re doing a restoration or paint removal in an older home, you’re still under the umbrella of these best practices, even if the exact certification requirements don’t apply to you as a DIYer. (Credit for picture: EPA)

Why infrared paint stripping is an especially good fit for lead-paint removal
Now let’s talk about infrared paint removal, how it works, why it’s safer (in many cases), and how it fits into the lead-safe story.
How it works
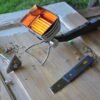
An infrared paint stripper uses radiant heat (infrared waves) to penetrate through the paint layers and loosen them from the substrate (e.g., wood trim or siding) without necessarily burning, charring or creating excessive dust. Because the heat loosens the paint from the bottom layer up and bubbles it, the paint “lifts” more readily, enabling easier removal with minimal mechanical abrasion. It avoids aggressive abrasives, heavy sanding, high-heat guns, or open flames, which might scorch or send lead-paint dust or fumes into the air.
Why it’s safer for lead work
- Less dust generation: Since you’re not aggressively sanding or grinding the surface, fewer particles are kicked loose into the air.
- No open flame or extreme heat: Compared to torching, which the EPA cautions against, infrared methods need only to heat paint to a lower temperature, are more controlled and safer around old wood or delicate trim.
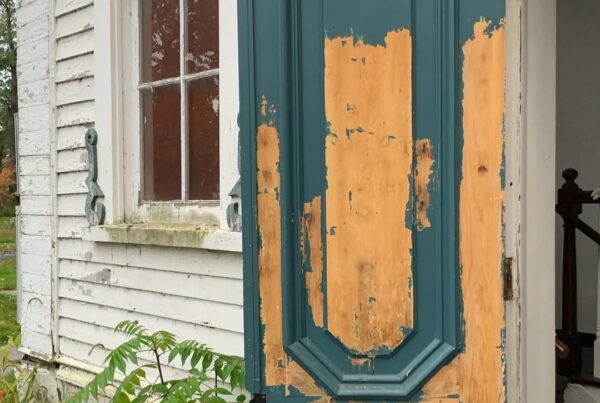
- Preservation friendly: For historic homes where you want to retain the original woodwork, moldings, and character, an infrared method is gentler you’re less likely to damage the substrate.
- Better control: The paint softens and lifts, so you can work section by section with minimal mess.
But remember the caveats
Even when you use an infrared paint stripper, you still need to treat the whole job with lead-safe practices. That means contain the area, protect yourself, manage waste, clean thoroughly and do final verification. The tool is part of the safer equation; the procedures are equally essential.
How Eco-Strip’s Speedheater™ models support safe, effective removal
At Eco-Strip, we believe in tools that respect both historic preservation and modern safety standards. If you’re considering an infrared paint remover for your project, here are three of our Speedheater™ models to keep in mind:
- Speedheater™ Standard 1100: Ideal for larger, flat surface areas; 3”x10” heated area per application makes longer scraper strokes easier
- Speedheater™ Rapid Slim: A versatile, faster, mid-tier model for narrower, flat surfaces and windows
- Speedheater™ Cobra: Lightweight and with the smallest and fastest heater; great for tight areas, irregular, or detailed surfaces, and window restoration

Each of these models lets you evenly and carefully apply infrared heat to loosen paint layers, then gently remove them with pull-type scrapers while minimizing dust and avoiding direct burning or charring. Combining a Speedheater™ with proper containment and cleanup gives you a best-practice approach to lead-paint removal in older homes.
A practical workflow: Using infrared for lead-paint removal
Here’s a sample workflow adapt as needed based on your project size, substrate (wood vs. metal), condition of the paint, and local regulations.
✨ Lead-Safe Paint Removal Workflow
| Step | Action | Why It Matters |
| 🧪 1. Test for Lead (or Assume) | If your home was built before 1978, assume lead-based paint may be present. Consider hiring a certified lead inspector. (EPA) | Establishes the hazard so you can treat the project appropriately and follow lead-safe practices. |
| 🧰 2. Prepare the Area | Remove or cover furniture, protect floors, seal off the room with plastic, plan entrances/exits, and wear proper PPE (respirator, goggles, gloves). (EPA) | Prevents lead dust and debris from migrating to clean areas of your home. |
| 🔧 3. Select the Tool | Choose a Speedheater model SH 1100, SH Cobra, or SH Rapid Slim, and plan your removal sequence based on paint layers, substrate, and condition. | Ensures you’re using the correct infrared tool for efficient, safe stripping. |
| 🌡️ 4. Apply Infrared Heat | Move the IR Paint Stripper slowly across the painted surface. As paint softens and lifts, gently scrape it away. Avoid overheating. | Infrared loosens paint without aggressive sanding or torching, reducing dust and preserving wood. |
| 🪛🪣 5. Scrape & Collect | Use a scraper/putty knife and a lined container to collect chips. Use wet methods (or tack cloths) instead of dry brushing. | Minimizes airborne lead-contaminated dust and captures particles safely. |
| 🧹🧽 6. Clean Continuously | Use a HEPA vacuum, wet wiping, and wet mopping on surrounding surfaces. Bag all waste in heavy-duty plastic. (EPA) | Continuous cleaning keeps dust levels low and aligns with EPA lead-safe recommendations. |
| 🔍✨ 7. Final Verification & Disposal | Pros: perform clearance testing. DIYers: visually inspect, re-wipe surfaces, vacuum again, and dispose of waste per local lead-disposal rules. (EPA) | Ensures the space is safe, clean, and free of lingering lead dust. |
Why preservation pros and DIYers alike choose infrared—with lead-safe practices in mind

If you’re passionate about preserving the character of an old house, the original wood trim, the historic siding, and the craftsmanship that modern homes often lack, you want a method that respects the building materials. Using an infrared paint remover gives you that gentler touch. Add to that the lead-safe procedures recommended by the EPA, and you’re doing justice to both the structure and occupant safety.
For DIYers: yes, you can do this work yourself, acknowledge that older homes built before 1978 may contain lead, and treat the job accordingly. Follow the containment, cleanup, and safe-waste practices. The infrared tool makes the paint removal portion cleaner, faster, and easier.
(Credit for picture: John Bosquet-Morra)
For preservation contractors, having an infrared tool in your toolbox signals to clients that you understand both the historic and safety sides. You’re offering something that’s efficient, controlled and respectful of building heritage.
Closing thoughts
Working in an old home is a labor of love you’re preserving history, craftsmanship and character. But when it comes to lead-based paint, love alone isn’t enough. You need the right tools, the right mindset and the right practices. An infrared paint stripper from Eco-Strip gives you one key piece of the puzzle the gentlest and dust-minimizing removal tool. But it must be paired with the containment, protective gear, cleanup and disposal practices that the EPA outlines.
So if you’re gearing up to remove old paint in a pre-1978 home, think: test (or assume lead), equip yourself, use the right tool, contain waste, clean thoroughly, and dispose responsibly. Use the Speedheater™ model that matches your project scale, and you’ll be balancing efficiency, safety and preservation. Let’s keep our old homes beautiful and healthy.
Ready to pick your Eco-Strip Speedheater™ model or want help planning your safe removal workflow? We’d be happy to help.